How to Use Heat Shrink Sleeving
Understand how to use heat shrink sleeving for electronics construction and repairs as well as for general home repairs as it is cheap, widely available and easy to use.
Home » Construction & manufacture » this page
Construction Hints & Tips Includes:
Practical hints & tips overview
How to make twisted pair wire
How to drill cases that are painted
How to use heat shrink sleeving
How to tidy wiring with looms
How to straighten kinked connecting wire
Bending & forming axial component leads
Heat shrink sleeving can be very useful when constructing electronics projects of repairing items of electronic equipment.
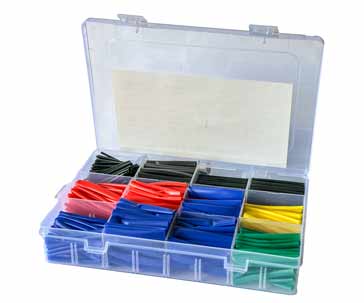
As the name suggests, heat shrink sleeving is a sleeve that can be put over a wire, joint, etc and then shrunk to size using heat.
The sleeving is very easily available either in packs of short lengths or as individual lengths from electronics component distributors as well as Amazon and eBay, etc.
Video: How to Use Heat Shrink Sleeving
What is heat shrink sleeving
As the name indicates, heat shrink sleeving is a form of sleeve that can be put over a wire, cable, etc and when heated it shrinks to fit snugly over item it is covering.
Heat shrink sleeving is often used in electronic equipment, electronic projects and forms of wiring to provide a very effective form of sleeve.
Heat shrink sleeving can be made from a variety of materials including polyester, polyolefin, PTFE, polyvinylidene Fluoride (PVDF), etc.
Each type of heat shrink sleeving has its own properties including the shrink ratio, shrink temperature and the like.
The most widely used form of heat shrink is polyolefin which provides a good shrink ratio (often 2:1), a good level of insulation, robustness and resistance to general chemical contamination.
Uses for heat shrink sleeving
Heat shrink sleeving can be used in a whole variety of different areas and situations:
Insulation: One of the most obvious applications for heatshink sleeving is to act as an insulator to protect bare wires and solder connections from touching and shorting.
Identification: Using coloured sleeves is a very easy way of identifying wires - having a short coloured section at either end of the wire. As heat shrink is available in a rainbow of colours, the different colours can be used as idents to mark different wires or cables.
Cable tie: Heat shrink can be used to hold the end of a cable together. For example a twisted wire pair might tend to pull apart at the ends, but a short length of heat shrink sleeving can be used to prevent this from happening.
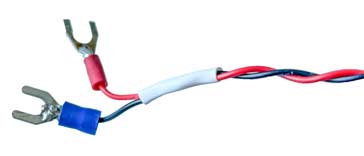
Heat shrink sleeving can be used to keep the end of a cable together as in the case of this twisted pair cable It could even be used at various points along the cable to keep everything in place.
Insulation: Heat shrink is made from insulating material and therefore it can be used to provide insulation for a bare wire or connection.
Protection: As heat shrink will fit snugly over the wire, etc when it is shrunk, it can be used to protect against the ingress of dust, dirt, and to some extent moisture.
There are many uses for heat shrink sleeving - it finds many uses in electronics construction as well as many other areas including general repairs around the home, etc.
Heat shrink specifications
For those who need to understand more about the specifications for the heat shrink, some of the mor important parameters are summarised below:
Shrink ratio: The shrink ratio is the relationship between the original size of the heat shrink tube and its shrunken form. Figures of 2:1 are quite typical and sometimes ratios of 3:1 may be seen. The higher the ratio, the greater the level of shrinkage.
Diameter: Normally the diameter is that of the inside diameter of the heat shrink sleeving. Sometimes, also the thickness will be given as well.
Shrink temperature: This is the temperature at which the sleeving shrinks. It varies between the different materials use and is typically around 120 - 125°C for polyolefin, 170 - 175°C for PTDF, and 180°C for silicone rubber.
Operating temperature: It might sometimes be necessary to consider the operating temperatures that are likely to be encountered, especially in some harsh environments. The standard polyolefin shrink sleeving is typically good for temperatures in excess of range -40 to +75°C
Although, these are some of the main specifications that might be seen, occasionally others may be found, and might be helpful, especially for some more exacting situations.
How to use heat shrink sleeving
Heat shrink sleeving is very easy to use, although a few guidelines may be useful for anyone who may not have used it much before.
Select the material: The first stage is to select the material from which the heat shrink sleeving will be made. Often, for many average jobs, this is not a problem and the standard olefin sleeves are great, but for others where higher temperatures are needed, more specialist materials will be needed and can be found on distributor websites.
Select the inside diameter: The inside diameter should be selected so that it will be able to easily be slipped over the wire, etc.
There should be sufficient margin for it to pass over the wire and reach the desired position but it should still be such that when it shrinks, it will firmly fit over required area when it has shrunk, remembering that the shrink ratio is typically 2:1, although some may be 3:1.
Cut it to length: Before sliding the heat shrink over the region to be sleeved, it should be cut to length. However remember that the length will shorten slightly - often the length will reduce by about 5 - 10%.
Position the heat shrink over the area to be covered: This may sound very obvious, but it is worth mentioning. It is particularly important when to place the sleeve onto a wire to be joined before the joint is made - simple you might think, but the number of times I have made a joint and afterwards remembered to add the sleeve or a part of a connector etc.
Also is a joint is to be soldered, position the sleeve along the wire sufficiently so that the act of soldering the joint doesn't shrink the sleeve. Once soldered, it can be positioned and the heat applied to shrink it.
Carefully heat it to shrink: There are various in which the sleeve can be shrunk. In professional laboratories they will have special heat guns, but there are many other ways to apply heat to shrink the sleeve.
Sadly hair dryers are not normally hot enough, but a soldering iron can be placed underneath the shrink sleeving, but be careful not to get the iron too close otherwise it will burn the sleeve and leave a brown mark on it.
The flame of a stove lighter or cigarette lighter can also be used, but again, be careful not to burn the sleeve as it is shrunk to size.
Check all is good: Once the joint has been made, and the sleeving shrunk over it, make a final careful check to ensure that all is good and everything has been suitably completed to the required standard - it is amazing what a final check can reveal at times!
Warning: Remember that the heat shrink sleeving has been heated to around 125°C and it will remain hot for a while. Give it time to cool down before touching it.
These are some of the main steps in using heat shrink sleeving, although everyone will develop their own methodology having used it once or twice.
Hints & tips
Heat shrink sleeving is very easy to use, but there are a few pointers and tips it might be worth summarising.
Check the material: For most of us, the polyolefin types are more than adequate. This is good because this is what is most widely available, but for some jobs, higher shrink temperatures may be required or other properties may be required.
Use the right diameter: It is important to check that the sleeving chosen is about the right diameter. It should be sufficient wide to slip over the area to be covered, but not to wide that it won't shrink to cover the required area.
Remember you can use different colours as idents: A good variety of colours are available - in fact sets of coloured heat shrink are widely available, and this means that can also be used as coloured idents. Sometimes it may even be possible to write on the shrunk sleeving using indelible pen to mark wire numbers, etc.
Beware of the heat source: As indicated by its name, heat shrink requires heat to shrink it. Be very careful with this, especially remembering to keep clear of the heat source and not to leave it on when the work is finished.
These are just a few simple hints, tips and guidelines it might be worth remembering when using heat shrink sleeving.
Heat shrink sleeving is very easy to use, and although most of us do not have access to heat guns outside a laboratory or manufacturing environment, there are still ways to use it very easily and effectively.
More Construction Ideas & Concepts:
Soldering
SMT component soldering
ESD - Electro-Static Discharge
PCB manufacture
PCB assembly
Return to Constructional Techniques menu . . .